Data is invaluable, and this is especially true these days, where we store hundreds of terabytes of data on the Web. To handle this amount of data, we need more than the traditional set of SQL statements like select, insert, and update. Unfortunately, manually creating SQL statements can be a difficult job, not to mention that it's one that's very error prone. To address this, a new category of frameworks have been developed called ORMs or Object Relational Mappers which help developers to map their models used in the source code to data models stored in the databases.
One of the most commonly used ORM in the Python world is SQLAlchemy. This framework is widely adopted because it implements a lot of best practices while delivering on the features that enterprise applications require.
In this article, I will present how to map models from the code to database tables, as well as how to save, load and query data using SQLAlchemy and Python. All the code from this article is available on GitHub.
Installation
The installation of SQLAlchemy can be done using: pip install sqlalchemy command, but I recommend doing this in a virtual environment:
greg@earth:~/$  mkdir how_to_sqlalchemy
greg@earth:~/$  mkdir how_to_sqlalchemy/venv
greg@earth:~/$  cd how_to_sqlalchemy
greg@earth:~/how_to_sqlalchemy$  virtualenv venv
greg@earth:~/how_to_sqlalchemy$  source venv/bin/activate
(venv)greg@earth:~/how_to_sqlalchemy$ pip install sqlalchemy
Here, I use MySQL as the database engine. To use SQLAlchemy along with MySQL, the mysql-python package has to be installed:
(venv)greg@earth:~/how_to_sqlalchemy$ pip install mysql-python The Models
SQLAlchemy supports a declarative style for mapping program models to database tables. To use this declarative approach, I need to import declarative_base from sqlalchemy.
from sqlalchemy.ext.declarative import declarative_base
BaseClass = declarative_base()
I can then create the three models Users, Projects, and Bids. Projects have Bids and Bids have Users. A project can have multiple bids, and one user can have multiple bids.
from sqlalchemy import Column, String, Integer, ForeignKey, Numeric
from BaseClass import BaseClass

class Bid(BaseClass):
    __tablename__ = 'bids'
    id = Column(Integer, primary_key=True, nullable=False, autoincrement=True)
    proposal = Column(String(800))
    price = Column(Numeric)
    user_id = Column(String(150), ForeignKey('users.user_name'))
    project_id = Column(Integer, ForeignKey('projects.id'))
First I need to import the Column, String, Integer, and all the other methods that I need to use. These methods offer an abstraction over the different SQL syntax rules that are specific to the database engines. As a developer, I don't have to know how to declare an 800 character string field in MySQL, PostgreSQL, or MSSQL because SQLAlchemy knows instead of me. All I need to do is to set the correct parameters for the data fields, and SQLAlchemy will resolve the SQL statement generation.
The __tablename__ property holds the name of the table that the model will map to once the database is created.
class User(BaseClass):
    __tablename__ = 'users'
    user_name = Column(String(150), primary_key=True)
    first_name = Column(String(150))
    last_name = Column(String(150))
    email = Column(String(250))
    bids = relationship('Bid')
The User class has a field called bids. This field is marked as a relationship that points to the Bid class. Please notice that the Bid class has a user_id field, which is Foreign Key for the user_name field. This field ensures that all the Bids can be associated to a user.
class Project(BaseClass):
    __tablename__ = 'projects'
    id = Column(Integer, primary_key=True, nullable=False, autoincrement=True)
    name = Column(String(150))
    description = Column(String(800))
    budget = Column(Numeric)
    bids = relationship('Bid')
The Project class is almost identical with User class, except it has an id field which auto increments and a budget field which is a numeric value. The Project class has a relationship with the Bid class too, because one Project can have more bids.
Connecting to the database
SQLAlchemy can create the database in case there is no database available. The code that does this is in the init_database.py file:
from sqlalchemy import create_engine
from BaseClass import BaseClass

def init(engine):
    db_engine = create_engine(engine, echo=True)
    BaseClass.metadata.create_all(db_engine)
The database engine is created, where the engine parameter is a string. Here's an example:
engine = 'mysql+mysqldb://johndoe:secret@localhost/how_to_sqlalchemy?unix_socket=/opt/lampp/var/mysql/mysql.sock'First, there is the database engine specific key, which, in this case, is mysql+mysqldb. Then comes the user:password@host/database construct. After these, there is an option to define parameters for the connection. In this example, the path to the uinx_socket is specified with the path pointing to the mysql socket.
Once the db_engine is initialized, the BaseClass.metadata.create_all method will take all the classes and model configuration available in the context, creating tables.

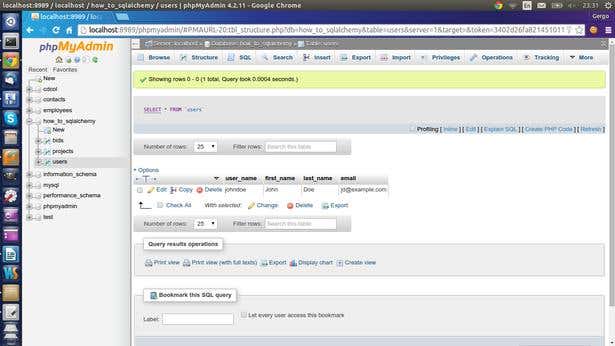
The screenshot shows what SQL statements were generated and executed to create the tables and relationships.
Manipulating Data
To add or read data from the MySQL database, a new SQLAlchemy session has to be created. SQLAlchemy has the concept of session, the same way Hibernate (a well-known ORM for Java) has.
class DAL:
    def __init__(self, engine):
        """
        :param engine: The engine route and login details
        :return: a new instance of DAL class
        :type engine: string
        """
        if not engine:
            raise ValueError('The values specified in engine parameter has to be supported by SQLAlchemy')
        self.engine = engine
        db_engine = create_engine(engine)
        db_session = sessionmaker(bind = db_engine)
        self.session = db_session()

    def add_user(self, first_name, last_name, user_name, email):
        """
        :type first_name: string
        :type last_name: string
        :type user_name: string
        :type email: string
        """
        new_user = User(user_name = user_name,
                        first_name = first_name,
                        last_name = last_name,
                        email = email)
        self.session.add(new_user)
        self.session.commit()
In the DAL class' constructor, a new database engine is created. A new session is then created for the engine using the sessionmaker method
In the add_user method, a new User object is created, which is then added to the session. In the last line, the commit method is invoked. This forces the session to flush all the changes in the session and write everything to the database.
Data can be loaded from the database using the query method, which can be extended with an order_by method. This generates the select SQL statement with and order by clause.
    def get_users(self):
        all_users = self.session.query(User).order_by(User.user_name)
        return all_users
Removing an item from the database is done with the delete method. It has to be given an item loaded from the session. This method truncates the Users table from the database.
    def clear_users(self):
        all_users = self.session.query(User)
        for user in all_users:
            self.session.delete(user)
        self.session.commit()
In case searching or filtering is needed, SQLAlchemy handles that very well with an easy-to-use Query API:
 def search_users(self, user_name):
        all_users = self.session.query(User).filter(User.user_name.like('%' + user_name + '%'))
        return all_users
The session is queried for User objects, which is then filtered to return only users which have a similar username like the one passed as argument.
I just went through the installation steps of SQLAlchemy, and covered how the engine parameter should be configured, and how Python classes can be mapped to database models. This also demonstrates how these models can be queried, saved and deleted using SQLAlchemy's query API. You can find all the available query API calls supported by the framework on the SQLAlchemy help page.